
| 일 | 월 | 화 | 수 | 목 | 금 | 토 |
|---|---|---|---|---|---|---|
| 1 | 2 | 3 | 4 | 5 | 6 | 7 |
| 8 | 9 | 10 | 11 | 12 | 13 | 14 |
| 15 | 16 | 17 | 18 | 19 | 20 | 21 |
| 22 | 23 | 24 | 25 | 26 | 27 | 28 |
| 29 | 30 | 31 |
- aws #아키텍트 #과정 #vpc #인프라 구축 #php #alb #application #load #balancer #security #group #igw #ec2 #vpc #virtual #private #cloud
- aws #아키텍트 #과정 #vpc #인프라 구축 #s3 #bucket #객체 #스토리지 #isci #이미지 #업로드
- 스파르타코딩클럽 #부트캠프 #IT #백엔드 #머신러닝 #AI #서버 #자동화 #SQL #기본문법 #데이터베이스
- aws #아키텍트 #과정 #vpc #인프라 구축 #amazon sns #server #less #architecture
- aws #아키텍트 #과정 #vpc #인프라 구축 #auto scailling #lauch template #ec2 instace #private #subnet
- aws #아키텍트 #과정 #vpc #인프라 구축 #ec2 #instance #launch #template #생성 #ami #amazone #machine #image
- aws #아키텍트 #과정 #vpc #인프라 구축 #t.g #target group #alb #application #load #balancer #web #server
- 스파르타코딩클럽 #부트캠프 #IT #백엔드 #머신러닝 #AI #서버 #자동화 #SQL #KDT #기본문법 #데이터베이스 #Computer #Science #CPU #메모리
- aws #아키텍트 #과정 #vpc #인프라 구축
- aws #아키텍트 #과정 #vpc #인프라 구축 #sqs #trigger #python3.9 #패키지 #
- 스파르타코딩클럽 #부트캠프 #IT #백엔드 #OSI #ISO #AI #서버 #자동화 #SQL #기본문법 #데이터베이스 #DBMS #Oracle #MongoDB #아키텍쳐 #DB
- aws #아키텍트 #과정 #vpc #인프라 구축 #s3 #bucket #객체 스토리지 #objects storage #events #upload #알림
- 스파르타코딩클럽 #부트캠프 #IT #백엔드 #머신러닝 #딥러닝 #AI #서버 #자동화 #SQL #기본문법 #데이터베이스 #DBMS #Oracle #MongoDB #아키텍쳐 #DB
- aws #아키텍트 #과정 #vpc #인프라 구축 #rds #endpoint #cloudwatch #monitoring
- aws #아키텍트 #과정 #vpc #인프라 구축 #second nat #gateway #routing table #route53 #고가용성 #private subnet #
- 비트 #바이트 #이진수
- aws #아키텍트 #과정 #vpc #인프라 구축 #haproxy #round robin #process #high ability #auto scailling #app server #launch template
- 스파르타코딩클럽 #부트캠프 #IT #백엔드 #머신러닝 #AI #서버 #자동화 #SQL #기본문법 #데이터베이스 #웹개발
- aws #아키텍트 #과정 #vpc #인프라 구축 #db #장애조치 #reand only #replica #events
- 공간복잡도 #공간자원 #캐시메모리 #SRAM #DRAM #시간복잡도
- 프로세스 #CPU #시공유 #커널
- aws #아키텍트 #과정 #vpc #인프라 구축 #alb #load balancer #t.g #target #group #haproxy #high ability #db #replica #region
- aws #아키텍트 #과정 #vpc #인프라 구축 #aurora #database #rds #rdbs #load #balancer #web #page #haproxy
- aws #아키텍트 #과정 #vpc #인프라 구축 #sqs #message #queue #sns구독
- 업로드 #lambda #함수 #모바일 이미지 #썸네일 이미지
- aws #아키텍트 #과정 #vpc #인프라 구축 #haproxy #고가용성 #테스트 #alb #application #load balancer #application
- 쓰레드 #쓰레드풀 #프로세스
- 스파르타코딩클럽 #부트캠프 #IT #백엔드 #머신러닝 #딥러닝 #AI #서버 #자동화 #SQL #기본문법 #데이터베이스
- 썸네일 #이미지
- aws #아키텍트 #과정 #vpc #인프라 구축 #rds #replica #복제본 #aurora #database #고가용성
- Today
- Total
요리사에서 개발자
스파르타 코딩클럽 부트캠프 (Java 문법 5장) 본문
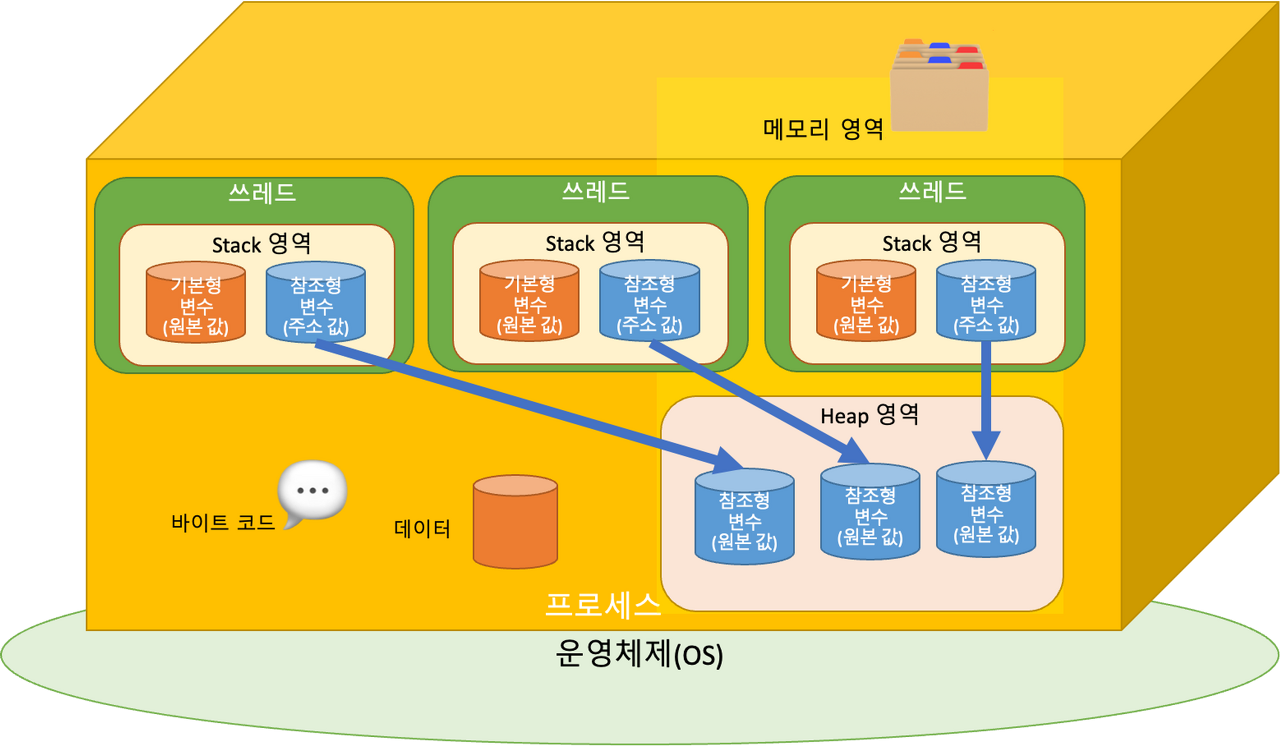
프로세스란
운영체제로부터 자원을 할당받는 작업의 단위
프로세스는
실행 중인 프로그램을 의미한다

프로세스 구조
운영체제가 프로그램 실행을 위한 프로세스를 할당할 때
프로세스안의 Code, Data, 메모리영역(Stack, Heap)을 함께 할당해준다.

쓰레드란
프로세스가 할당받은 자원을 이용하는 실행의 단위
쓰레드는
프로세스 내에서 코드 실행의 흐름이다.
프로세스가 작업중인 프로그램에서 실행 요청이 들어오면 쓰레드를 만들어 명령을 처리한다.
쓰레드들은 실행을 위한 프로세스 내 주소 공간이나
메모리 공간(Heap)을 공유받는다
쓰레드들은 명령처리를 위한 자신만의 메모리 공간(Stack)도 할당받는다.
Java 쓰레드
일반 쓰레드와 동일하며
JVM(Java Vertual Marchine)프로세스 안에서 실행되는
쓰레드를 말한다.
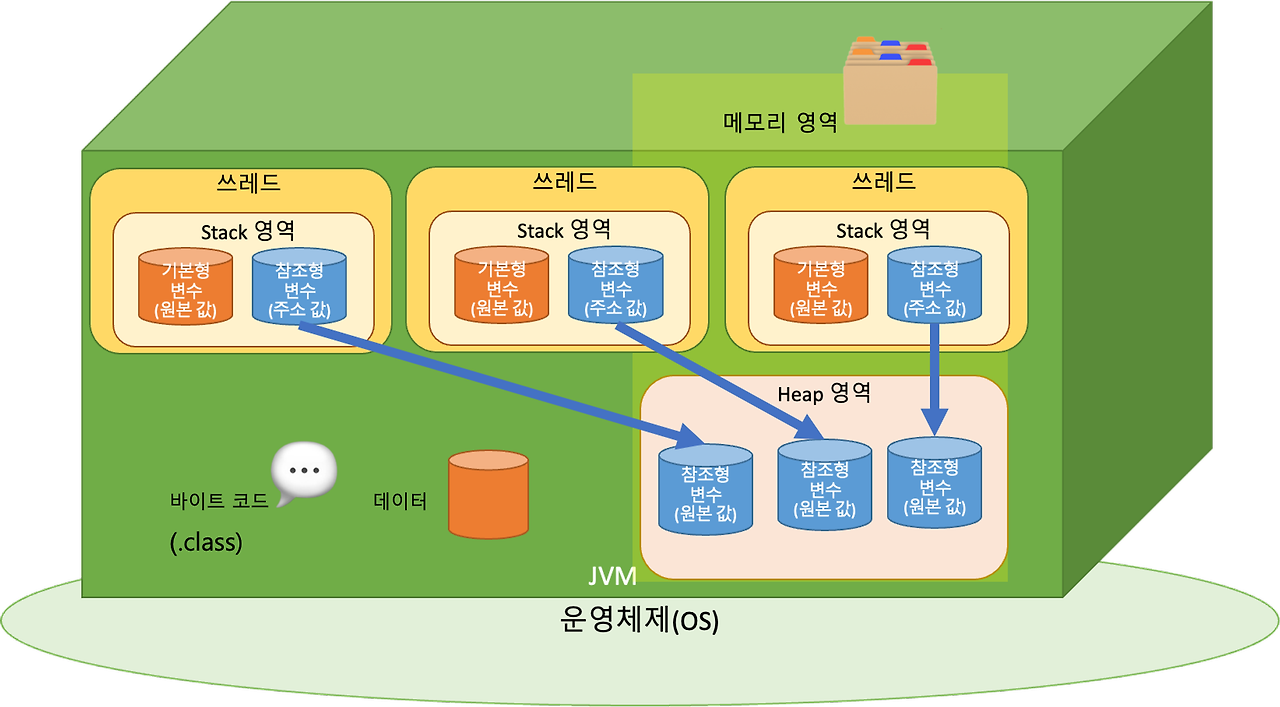
Java는 멀티쓰레드를 지원한다.
메인쓰레드는 필요에 따라
쓰레드들을 생성하여 병렬로 코드를 실행시킬 수 있다.
싱글 쓰레드
프로세스 안에서 하나의 쓰레드만 실행되는 것
main()메서드의 쓰레드를 메인 쓰레드라한다
멀티 쓰레드
프로세스 안에서 여러개의 쓰레드가 실행되는 것
하나의 프로세스는 여러 개의 쓰레드를 가질 수 있고
이 쓰레드들은 프로세스의 자원을 공유한다.
장점
- 여러개의 쓰레드(실행 흐름)을 통해 작업을 동시에 여러개 할 수 있다.(성능 상승)
- Stack을 제외한 모든 영역에서 메모리를 공유하기에 자원소비가 효율적이다.
- 응답 쓰레드와 작업 쓰레드를 분리하여 빠르게 응답할 수 있다.(비동기)
단점
- 동기화 문제 발생 가능
- 프로세스의 자원을 서로 공유하기에 충돌이 일어날 수 있다.
- 교착 상태 (데드락)이 발생할 수 있다.(서로가 서로의 데이터를 필요해야하는 경우 )
https://hs-backend.tistory.com/7
스파르타 코딩클럽(부트캠프) 4장 프로세스 쓰레드와 쓰레드
쓰레드 : 프로세스 내 에서 실행되는 실행단위 쓰레드 풀 : 쓰레드를 미리 생성해 두어 작업 처리에 사용되는 쓰레드를 제한된 갯수 만큼 정해놓고 작업 큐에 등어오는 작업들을 하나씩 쓰레드
hs-backend.tistory.com
Thread
public class TestThread extends Thread {
    @Override
    public void run() {
        //실제 우리가 쓰레드에서 수행할 작업
        for(int i = 0; i<100; i++){
            System.out.print("*");
        }
    }
}
public class TestRunnable implements Runnable {
@Override
public void run() {
//쓰레드에서 수행할 작업 정의
for(int i=0; i<100; i++){
System.out.print("$");
}
}Runnable
Thread를 직접 상속 받아 사용하지 않고
Runnable을 사용하여 쓰레드를 구현하는 이유
클래스와 인터페이스 차이
다중 상속을 지원하지 않는다
Thread를 상속받아 처리하게되면 확장성이 매우 떨어진다.
Runnble은 인터페이스이기 때문에 다른 클래스를 상속받을 수 있다(확장성의 유리함)
public class Main {
    public static void main(String[] args) {
        TestThread thread = new TestThread();
        thread.start();
        Runnable run = new TestRunnable();
        Thread thread = new Thread(run); //쓰레드 생성

        thread.start(); // 쓰레드 실행
    }
}
싱글 쓰레드
package thread.single;

public class Main {
    public static void main(String[] args) {
        Runnable task = () -> {
            System.out.println("2번 => "+Thread.currentThread().getName());
            for (int i = 0; i < 100; i++) {
                System.out.print("$");
            }
        };

        System.out.println("1번 =>"+Thread.currentThread().getName());
        Thread thread1 = new Thread(task);
        thread1.setName("thread1");

        thread1.start();
    }
}
멀티쓰레드
public class Main {
    public static void main(String[] args) {
        Runnable task = () -> {
            for (int i = 0; i < 100; i++) {
                System.out.print("$");
            }
        };
        Runnable task2 = () -> {
            for (int i = 0; i < 100; i++) {
                System.out.print("*");
            }
        };


        Thread thread1 = new Thread(task);
        thread1.setName("thread1");
        Thread thread2 = new Thread(task2);
        thread2.setName("thread2");

        thread1.start();
        thread2.start();
    }
main() 쓰레드 에서 멀티 쓰레드로 동시 작업을 실행하면
입력값 $(thread1) 와 *(thread2)이 랜덤으로 출력된다
데몬 쓰레드란
보이지 않는곳(background)에서 실행되는
낮은 우선순위를 가진 쓰레드
보조적인 역할을 담당
대표적인 데몬 쓰레드로는 메모리 영역을 정리해주는
가비지 컬렉터(GC)가 존재한다.
public class Main {
    public static void main(String[] args) {
        Runnable demon = () -> {
            for (int i = 0; i < 1000000; i++) {
                System.out.println("demon");
            }
        };
        //우선순위가 낮다 => 상대적으로 다른 쓰레드에 비해 리소스를 적게 할당 받는다.
        Thread thread = new Thread(demon);
        thread.setDaemon(true);

        thread.start();

        for (int i = 0; i < 100; i++) {
            System.out.println("task");
        }
높은 수선순위를 가진 쓰레드(foreground)가 실행 종료되면
데몬 쓰레드도 전부 다 출력하지않고 종료한다.(보조역할)
쓰레드 우선순위
쓰레드 작업의 중요도에 따라 쓰레드의 우선순위를 부여할 수 있다.
작업의 중요도가 높을 때 우선순위를 높게 지정하면
더 많은 메모리를 할당받아 빠르게 처리할 수 있다.
쓰레드는 생성될 때 우선순위가 정해진다.
최대 우선순위(MAX_PRIORITY) = 10
최소 우선순위(MIN_PRIORITY) = 1
보통 우선순위(NROM_PRIORITY) =5
나뉜다.
이 우선순위는 OS가 아닌 JVM에서 설정한 우선순위이다.
쓰레드 우선순위는 setPriority() 메서드로 설정할 수 있다.
Thread thread1 = new Thread(task1);
thread1.setPriority(8);
getPriorty()로 우선순위를 반환할 수 있다.
int threadPriority = thread1.getPriority();
System.out.println("threadPriority = " + threadPriority);
우선 순위가 높다고 반드시 쓰레드가 먼저 종료되지는 않는다.(변수)
public class Main {
    public static void main(String[] args) {
        Runnable task1 = () -> {
            for (int i = 0; i < 100; i++) {
                System.out.print("$");
            }
        };

        Runnable task2 = () -> {
            for (int i = 0; i < 100; i++) {
                System.out.print("*");
            }
        };

        Thread thread1 = new Thread(task1);
        thread1.setPriority(8);
        int threadPriority = thread1.getPriority();
        System.out.println("threadPriority = " + threadPriority);

        Thread thread2 = new Thread(task2);
        thread2.setPriority(2);

        thread1.start();
        thread2.start();
    }
쓰레드 그룹
서로 관련이 있는 쓰레드들을 그룹으로 묶어 다룰 수 잇다.
쓰레드들은 기본적으로 그룹에 포함되어 있다.
JVM시작 => system그룹 생성 => 쓰레드 생성 => System 그룹에 자동포함
메인쓰레드는 systme 그룹 하위 main그룹에 포함된다.
모든 쓰레드들은 반드시 하나의 그룹에 포함되 있어야 한다.
쓰레드 그룹을 지정하지 않을경우 자동으로 main그룹에 포함된다.
public class Main {
    public static void main(String[] args) {
        Runnable task = () -> {
            while (!Thread.currentThread().isInterrupted()) {
                try {
                    Thread.sleep(1000);
                    System.out.println(Thread.currentThread().getName());
                } catch (InterruptedException e) {
                    break;
                }
            }
            System.out.println(Thread.currentThread().getName() + " Interrupted");
        };

        // ThreadGroup 클래스로 객체를 만듭니다.
        ThreadGroup group1 = new ThreadGroup("Group1");

        // Thread 객체 생성시 첫번째 매개변수로 넣어줍니다.
        // Thread(ThreadGroup group, Runnable target, String name)
        Thread thread1 = new Thread(group1, task, "Thread 1");
        Thread thread2 = new Thread(group1, task, "Thread 2");

        // Thread에 ThreadGroup 이 할당된것을 확인할 수 있습니다.
        System.out.println("Group of thread1 : " + thread1.getThreadGroup().getName());
        System.out.println("Group of thread2 : " + thread2.getThreadGroup().getName());

        thread1.start();
        thread2.start();

        try {
            // 현재 쓰레드를 지정된 시간동안 멈추게 합니다.
            Thread.sleep(5000);
        } catch (InterruptedException e) {
            e.printStackTrace();
        }

        // interrupt()는 일시정지 상태인 쓰레드를 실행대기 상태로 만듭니다.
        group1.interrupt();

    }
쓰레드 상태

실행 대기를 반복하여 run()을 수행한다.
run()이 종료되면 실행이 멈춘다.

일시정지 상태에서 쓰레드가 실행할 수 없는 상태가 된다.
쓰레드가 다시 실행할려면
일시정지 상태에서 실행대기 상태로 넘어가야한다.
|
상태
|
Enum
|
설명
|
|
객체생성
|
NEW
|
쓰레드 객체 생성, 아직 start() 메서드 호출 전의 상태
|
|
실행대기
|
RUNNABLE
|
실행 상태로 언제든지 갈 수 있는 상태
|
|
일시정지
|
WAITING
|
다른 쓰레드가 통지(notify) 할 때까지 기다리는 상태
|
|
일시정지
|
TIMED_WAITING
|
주어진 시간 동안 기다리는 상태
|
|
일시정지
|
BLOCKED
|
사용하고자 하는 객체의 Lock이 풀릴 때까지 기다리는 상태
|
|
종료
|
TERMINATED
|
쓰레드의 작업이 종료된 상태
|
쓰레드 제어

sleep() : 지정시간동안 멈추게한다.
try {
        Thread.sleep(5000); // 5초
    } catch (InterruptedException e) {
        e.printStackTrace();
    }
};
Thread.sleep(ms); ms (밀리초) 단위로 설정된다
예외처리를 해야한다.
특정 쓰레드를 지목해서 멈추게 하는것은 불가능하다.
public class Main {
    public static void main(String[] args) {
        Runnable task = () -> {
            try {
                Thread.sleep(2000);
            } catch (InterruptedException e) {
                e.printStackTrace();
            }
            System.out.println("task : " + Thread.currentThread().getName());
        };

        Thread thread = new Thread(task, "Thread");  //New
        thread.start();  //New = > RUNNABLE

        try {
            thread.sleep(1000);
            System.out.println("sleep(1000) : " + Thread.currentThread().getName());
        } catch (InterruptedException e) {
            e.printStackTrace();
        }
    }
interrupt()
일시정지 상태인 쓰레드를 실행대기 상태로 만든다
sleep 실행 중에 nterrupt()가 실행되면 예외가 발생한다.
interrupt () 오류 발생
public class Main {
    public static void main(String[] args) {
        Runnable task = () -> {
            try {
                Thread.sleep(1000);
                System.out.println(Thread.currentThread().getName());
            } catch (InterruptedException e) {
                e.printStackTrace();
            }
            System.out.println("task : " + Thread.currentThread().getName());
        };

        Thread thread = new Thread(task, "Thread");
        thread.start();

        thread.interrupt();

        System.out.println("thread.isInterrupted() = " + thread.isInterrupted());

    }
}
! Thread.currentThread().isInterrupted()로
interrupted 상태를 체크해서 처리하면 오류가 발생하지 않는다.
public class Main {
    public static void main(String[] args) {
        Runnable task = () -> {
            while (!Thread.currentThread().isInterrupted()) {
                try {
                    Thread.sleep(1000);
                    System.out.println(Thread.currentThread().getName());
                } catch (InterruptedException e) {
                    break;
                }
            }
            System.out.println("task : " + Thread.currentThread().getName());
        };

        Thread thread = new Thread(task, "Thread");
        thread.start();

        thread.interrupt();

        System.out.println("thread.isInterrupted() = " + thread.isInterrupted());

    }
join()
정해진 시간동안 지정한 쓰레드가 작업하는 것을 기다린다.
시간을 지정하지 않았을 경우
지정 쓰레드 작업이 끝날때 까지 기다린다.
Thread thread = new Thread(task, "thread");

thread.start();

long start = System.currentTimeMillis();

try {
    thread.join();

} catch (InterruptedException e) {
    e.printStackTrace();
}
public class Main {
public static void main(String[] args) {
Runnable task = () -> {
try {
Thread.sleep(5000); // 5초
} catch (InterruptedException e) {
e.printStackTrace();
}
};
Thread thread = new Thread(task, "thread");
thread.start();
long start = System.currentTimeMillis();
try {
thread.join();
} catch (InterruptedException e) {
e.printStackTrace();
}
// thread 의 소요시간인 5000ms 동안 main 쓰레드가 기다렸기 때문에 5000이상이 출력됩니다.
System.out.println("소요시간 = " + (System.currentTimeMillis() - start));
}yield()
남은 시간을 다음 쓰레드에게 양보하고
쓰레드 자신은 실행대기 상태가된다.
public class Main {
    public static void main(String[] args) {
        Runnable task = () -> {
            try {
                for (int i = 0; i < 10; i++) {
                    Thread.sleep(1000);
                    System.out.println(Thread.currentThread().getName());
                }
            } catch (InterruptedException e) {
                Thread.yield();
            }
        };

        Thread thread1 = new Thread(task, "thread1");
        Thread thread2 = new Thread(task, "thread2");
        //thread 1, 2는 같이 1초에 한번씩 출력된다.
        thread1.start();
        thread2.start();

        try {
            Thread.sleep(5000);
        } catch (InterruptedException e) {
            e.printStackTrace();
        }
        // 5초 뒤에 thread1은 대기 상태가 된다.
        // thread2에게 양보한다.
        thread1.interrupt();

    }
Synchronized
멀티쓰레드는 여러쓰레드가 한 프로세스에서 자원을 공유하고 작업하기에
서로에게 영향을 끼칠 수 있다.(에러발생)
에러를 방지하기 위해 한 쓰레드가 진행 중인 작업을
다른 쓰레드가 침범하지 못하게 하는것
쓰레드 동기화(Synchronization)라 한다.
동기화를 하기위해 다른 스레드 침범을 막아야 하는 코드를
Lock(임계영역)으로 설정하면된다.
임계영역에 Lock을 가진 단 하나의 쓰레드만 출입이 가능하다.
임계영역 지정 방법
메서드 전체를 임계영역으로 지정한다.
public synchronized void asyncSum() {
//침범 막는 코드 입력
}
특정영역을 임계영역으로 지정한다
synchronized (해당 객체의 참조변수) {
//침범 막는 코드
}
public class Main {
    public static void main(String[] args) {
        AppleStore appleStore = new AppleStore();

        Runnable task = () -> {
            while (appleStore.getStoredApple() > 0) {
                appleStore.eatApple();
                System.out.println("남은 사과의 수 = " + appleStore.getStoredApple());
            }

        };
        //3개의 thread를 한꺼번에 만들어서 start를 해버린다
        //생성(New)과 동시에 Start(New => Runnable)
        for (int i = 0; i < 3; i++) {
            new Thread(task).start();
        }
    }
}

class AppleStore {
    private int storedApple = 10;

    public int getStoredApple() {
        return storedApple;
    }

    public void eatApple() {
        if (storedApple > 0) {
            try {
                Thread.sleep(1000);
            } catch (InterruptedException e) {
                e.printStackTrace();
            }
            storedApple -= 1;
        }
    }
}
침범을 막은 코드를 수행하다가
작업 할 상황이 아니면
wait()을 호출하여 쓰레드가 Lock을 반납하고
기다리게 할 수 있다.
기다리게 함으로써 다른 객체는 작업을 수행할 수 있고
다시 작업하고싶으면 notify()를 호출하여
중단한 쓰레드가 다시 Lock을 얻고 진행할 수 있다.
wait()
실행 중이던 쓰레드는 대기하여 기다린다.
notify()
대기하던 쓰레드 중 임의 쓰레드만 실행된다.
import java.util.ArrayList;
import java.util.List;

public class Main {
    public static String[] itemList = {
            "MacBook", "IPhone", "AirPods", "iMac", "Mac mini"
    };
    public static AppleStore appleStore = new AppleStore();
    public static final int MAX_ITEM = 5;

    public static void main(String[] args) {

        // 가게 점원
        Runnable StoreClerk = () -> {
            while (true) {
                //0부터 4까지 random한 값을 뽑아내기위한
                int randomItem = (int) (Math.random() * MAX_ITEM);

                //restock 재고를 넣는 메서드
                appleStore.restock(itemList[randomItem]);
                try {
                    Thread.sleep(50);
                } catch (InterruptedException ignored) {
                }
            }
        };

        // 고객
        Runnable Customer = () -> {
            while (true) {
                try {
                    Thread.sleep(77);
                } catch (InterruptedException ignored) {
                }

                int randomItem = (int) (Math.random() * MAX_ITEM);

                //sale : 판매하는 메서드
                appleStore.sale(itemList[randomItem]);
                System.out.println(Thread.currentThread().getName() + " Purchase Item " + itemList[randomItem]);
            }
        };


        new Thread(StoreClerk, "StoreClerk").start();
        new Thread(Customer, "Customer1").start();
        new Thread(Customer, "Customer2").start();

    }
}

class AppleStore {
    private List<String> inventory = new ArrayList<>();

    public void restock(String item) {
        synchronized (this) {
            while (inventory.size() >= Main.MAX_ITEM) {
                System.out.println(Thread.currentThread().getName() + " Waiting!");
                try {
                    wait(); // 재고가 꽉 차있어서 재입고하지 않고 기다리는 중!
                    Thread.sleep(333);
                } catch (InterruptedException e) {
                    e.printStackTrace();
                }
            }
            // 재입고
            inventory.add(item);
            notify(); // 재입고 되었음을 고객에게 알려주기
            System.out.println("Inventory 현황: " + inventory.toString());
        }
    }

    public synchronized void sale(String itemName) {
        while (inventory.size() == 0) {
            System.out.println(Thread.currentThread().getName() + " Waiting!");
            try {
                wait(); // 재고가 없기 때문에 고객 대기중
                Thread.sleep(333);
            } catch (InterruptedException e) {
                e.printStackTrace();
            }
        }

        while (true) {
            // 고객이 주문한 제품이 있는지 확인
            for (int i = 0; i < inventory.size(); i++) {
                if (itemName.equals(inventory.get(i))) {
                    inventory.remove(itemName);
                    notify(); // 제품 하나 팔렸으니 재입고 하라고 알려주기
                    return; // 메서드 종료
                }
            }

            // 고객이 찾는 제품이 없을 경우
            try {
                System.out.println(Thread.currentThread().getName() + " Waiting!");
                wait();
                Thread.sleep(333);
            } catch (InterruptedException e) {
                e.printStackTrace();
            }
        }

    }
Lock
synchronized 블럭으로 동기화하면 자동 Lock이 걸리고 풀린다.
같은 메서드 내에서만 Lock을 걸 수 있다.
이런 제약을 해결하기 위하여 Lock 클래스를 사용한다.
ReentrantLock
재진입 가능 Lock, 일반 배타 Lock
특정 조건Lock을 풀고 다시 Lock을 얻어 임계영역으로 진입이 가능하다.
public class MyClass {
    //메소드A 는 lcok 1을 갖는다
    private Object lock1 = new Object();
    //메소드 B는 lock2를 갖는다.
    private Object lock2 = new Object();
    //메소드 A에서 메소드 B를 호출
    public void methodA() {
        synchronized (lock1) {
            methodB();
        }
    }
    //메소드 B에서 A를 호출
    public void methodB() {
        synchronized (lock2) {
            // do something
            methodA();
        }
    }
위와같이 A는 B를 B는 A를 호출할 경우 데드락이 발생할 수 있으나
ReentrantLock을 사용하면
같은 스레드가 Lock을 갖고있더라도
Lock을 유지하며 계속 실행할 수 있기에
데드락이 발생하지 않는다.
ReentrantReadWriteLock
- 읽기를 위한 Lock과 쓰기Lock을 제공한다
- 읽기는 공유(Lock) , 쓰기는 베타(Lock)이다.
- 읽기 Lock이 걸려있으면 다른 스레드들도 Lock을 중복으로 걸고 읽기를 할 수 있다.
- 읽기 Lock이 걸려있는 상태에서 쓰기 Lock은 허용되지 않는다.(데이터 변경방지)
StampedLock
- ReentrantReadWirteLock에 낙관적인 Lock기능 추가한것
- 낙관적인 읽기 Lock, 쓰기 Lock에 의해 해제가능하다.
- 무조건 읽기 Lock을 걸지 않고 쓰기와 읽기가 충돌할 때만 쓰기 후 읽기 Lock을 건다.
낙관적인 Lock이란
데이터 변경 전 Lock을 걸지 않는 것
데이터 변경할 때 충돌 가능성이 적은 상황에 사용한다.
낙관적인 락을 사용하면
읽기와 쓰기 작업 모두 빠르게 처리된다
쓰기 작업이 발생하면 데이터가 이미 변경된 경우에
다시 일기작업을 수행하여 새로운 값을 읽고
변경작업을 다시 수행한다.
Condition은
wait()과 notify()의 문제점인
waiting pool 내 쓰레드를 구분하지 못한것 을 해결한 것이다.
wait() 과 notify() 대신
Condition의 await()과 signal() 을 사용한다.
public class Main {
    public static final int MAX_TASK = 5;

    private ReentrantLock lock = new ReentrantLock();

    // lock으로 condition 생성
    private Condition condition1 = lock.newCondition();
    private Condition condition2 = lock.newCondition();

    private ArrayList<String> tasks = new ArrayList<>();

    // 작업 메서드
    public void addMethod(String task) {
        lock.lock(); // 임계영역 시작

        try {
            while(tasks.size() >= MAX_TASK) {
                String name = Thread.currentThread().getName();
                System.out.println(name+" is waiting.");
                try {
                    condition1.await(); // wait(); condition1 쓰레드를 기다리게 합니다.
                    Thread.sleep(500);
                } catch(InterruptedException e) {}
            }

            tasks.add(task);
            condition2.signal(); // notify();  기다리고 있는 condition2를 깨워줍니다.
            System.out.println("Tasks:" + tasks.toString());
        } finally {
            lock.unlock(); // 임계영역 끝
        }
    }
}'Java' 카테고리의 다른 글
| 스파르타 부트캠프 자바 컬렉션 정리 (0) | 2024.05.08 |
|---|---|
| 스파르타 코딩클럽 부트캠프 배열(Array), 다형성(1차원, 2차원, 3차원) (0) | 2024.05.07 |
| 스파르타 코딩클럽 부트캠프 (Java 문법 4장) (1) | 2024.05.02 |
| 스파르타 코딩클럽 부트캠프 (Java 문법 3장) (0) | 2024.04.29 |
| 스파르타 코딩클럽 자바문법 2장 배열, 컬렉션정리 (1) | 2024.04.25 |


