스프링 시큐리티 내부 구조 Security Filter Chain 등록, 여러개 등록, 특정 요청 허가
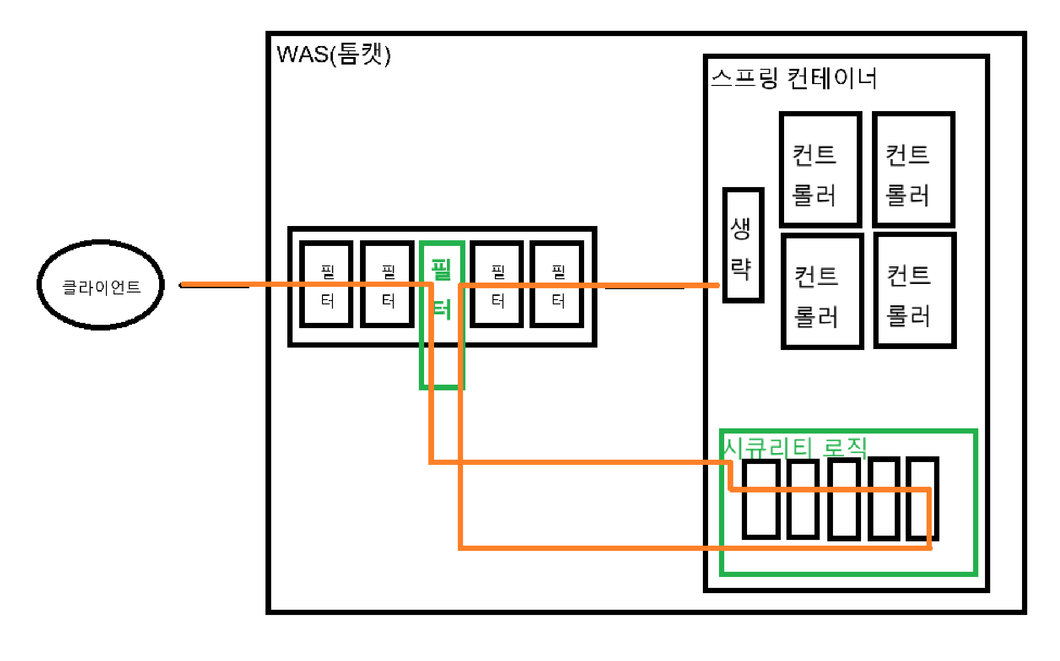

커스텀 SecurityFilterChain 등록하는 방법
스프링 시큐리티 의존성을 추가하면
기본적인 DefaultSecurityFilterChain 하나가 등록됨
원하는 SecurityFilterChain 등록을 하기위해
SecuirtyFilterChain을 리턴하는
@Bean 메소드를 등록하면 된다.(한개 이상 등록이 가능하다)
@Configuration
@EnableWebSecurity
public class SecurityConfig {

    @Bean
    public SecurityFilterChain filterChain1(HttpSecurity http) throws Exception{

        return http.build();
    }
}
한개 이상 등록하는 방법으로는 동일하게 하면된다.
@Configuration
@EnableWebSecurity
public class SecurityConfig {

    @Bean
    public SecurityFilterChain filterChain1(HttpSecurity http) throws Exception{

        return http.build();
    }
    @Bean
    public SecurityFilterChain filterChain2(HttpSecurity http) throws Exception{

        return http.build();
    }
}
FilterChainProxy에서 등록확인하는 방법

디버그로 실행을하고
포스트맨으로 나의 해당 포트에 요청을 보내면
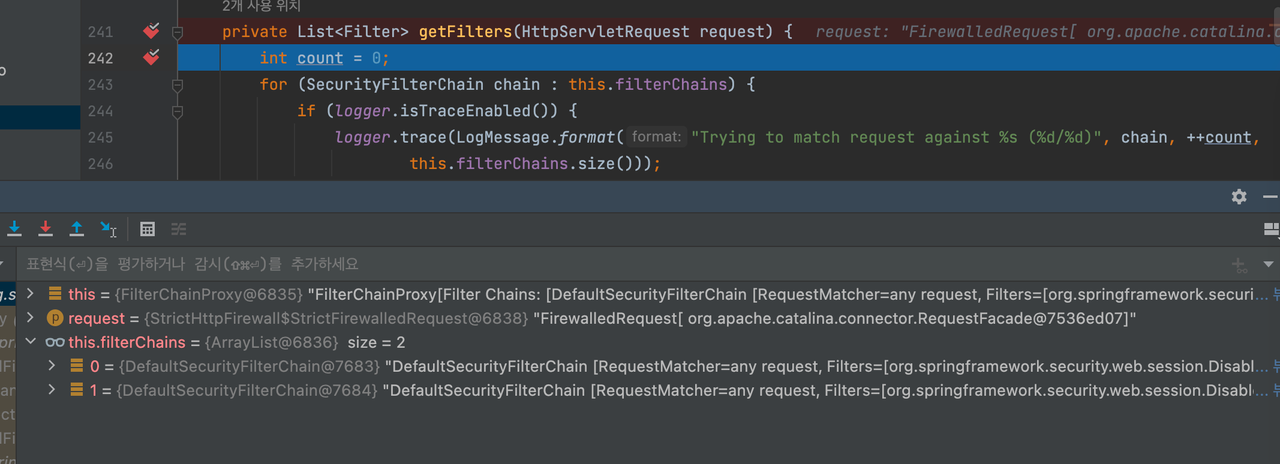
위와 같이 size가 2로 나오는 것을 확인할 수 있다.
위와 같이 설정한 것에 대한 문제점은

둘다 수행 될 수 있다는 점이다.
그래서 할 수 있는 방법
위에는 login 경로를 requestMatchers로 설정을 해놓고
2번째 Filterchain에는
다른 경로를 맵핑해 놓으면 로직에 맞게 수행된다.
@Bean
public SecurityFilterChain filterChain1(HttpSecurity http) throws Exception {

    http
            .authorizeHttpRequests((auth) -> auth
                    .requestMatchers("/user").permitAll());

    return http.build();
}

@Bean
public SecurityFilterChain filterChain2(HttpSecurity http) throws Exception {

    http
            .authorizeHttpRequests((auth) -> auth
                    .requestMatchers("/admin").permitAll());

    return http.build();
}
위와 같이 설정하면 될꺼같지만
시큐리티의 매핑자체가 없어서 잘못된 응답이 발생한다.
filterChain1이 filterChain2보다 먼저 등록되어있고
SecurityFilterChain에 대한 경로 설정을 추가적으로 하지않았기 때문에 그렇다.
해결하는 방법은
http
        .securityMatchers((auth) -> auth.requestMatchers("/user"));
경로를 매핑해주면된다.
매핑을 해주면
@Bean
public SecurityFilterChain filterChain1(HttpSecurity http) throws Exception {

    http
            .securityMatchers((auth) -> auth.requestMatchers("/user"));

    http
            .authorizeHttpRequests((auth) -> auth
                    .requestMatchers("/user").permitAll());

    return http.build();
}

@Bean
public SecurityFilterChain filterChain2(HttpSecurity http) throws Exception {

    http
            .securityMatchers((auth) -> auth.requestMatchers("/admin"));

    http
            .authorizeHttpRequests((auth) -> auth
                    .requestMatchers("/admin").authenticated());

    return http.build();
}
경로로 접근을 /admin 경로로 접근을 하였을 때 오류가 안나는 것을 확인할 수있다.
또 다른 방법은 @Order() 를 이용하는 방법이다.
N개의 SecurityFilterChain을 등록한 뒤
등록되는 순서를 직접 선정하고 싶은 경우
@Bean
@Order(1)
public SecurityFilterChain filterChain1(HttpSecurity http) throws Exception{

    return http.build();
}

@Bean
@Order(2)
public SecurityFilterChain filterChain2(HttpSecurity http) throws Exception {

    return http.build();
}
위와 같이 @Order() 어노테이션 안의 숫자를 명시해주면된다.
마지막으로 특정 요청은 필터를 거치지 않도록 할 수 있다.
굳이 경로로 접근을 하지않아도
정적자원 (이미지, CSS)의 경우는 필터를 통과하지 않도록 설정할 수 있다.
@Bean
public WebSecurityCustomizer webSecurityCustomizer() {

    return web -> web.ignoring().requestMatchers("/img/**");
}
위와 같이 설정을 하게되면 서버의 자원을 들이지 않고 접근이 가능하다.
0번인덱스로 접근이 되기에 아주 빠르게 응답을 진행할 수 있다.
WebSecurityCustomizer (spring-security-docs 6.3.0 API)
docs.spring.io
https://substantial-park-a17.notion.site/4-SecurityFilterChain-e9626964dc1a4f47aab0d257c73055d6
4. SecurityFilterChain 등록 | Notion
최종 변경 : 2024.03.29
substantial-park-a17.notion.site
https://www.youtube.com/watch?v=QoPXJ2LEqTc&list=PLJkjrxxiBSFCFM0pjDwm6F98veieD0MER&index=4
